The Intersection Observer API is a powerful tool for detecting changes in the visibility of an element relative to a viewport or a parent element. One of its exciting use cases is creating smooth and visually appealing scroll-and-snap effects. This tutorial demonstrates how to implement such effects using vanilla JavaScript and React.
- How the Intersection Observer API Works
- A Basic Example Vanilla Javascript
- Adding a Custom Root
- A React Example
- The Result
- Conclusion
How the Intersection Observer API Works
A typical implementation of the API follows these steps:
- Create an
IntersectionObserverinstance with a callback function and an options object. - Define the callback function to handle visibility changes. It is triggered whenever a target element enters or exits the intersection area.
- Configure the observer with options, such as a threshold to determine when the callback is triggered (e.g. when 10% of the element is visible).
- Observe target elements by calling the
observemethod on the observer instance. - Add CSS to control the styles and animations.
A Basic Example Vanilla Javascript
First, let’s create the HTML structure for our scroll-and-snap effect.
<div class="container">
  <div class="block">
    <h2 class="title">Title 1</h2>
    <p class="content">Content 1 with a delayed effect.</p>
  </div>
  <div class="block">
    <h2 class="title">Title 2</h2>
    <p class="content">Content 2 with a delayed effect.</p>
  </div>
  <div class="block">
    <h2 class="title">Title 3</h2>
    <p class="content">Content 3 with a delayed effect.</p>
  </div>
</div>
Now, we’ll use the Intersection Observer API to trigger animations as the user scrolls.
const blocks = document.querySelectorAll(".block")

// Create an IntersectionObserver instance
const observer = new IntersectionObserver(
  (entries) => {
    entries.forEach((entry) => {
      if (entry.isIntersecting) {
        entry.target.scrollIntoView({ behavior: "smooth", block: "start" })
        // Add visibility classes to animate elements
        const title = entry.target.querySelector(".title")
        const content = entry.target.querySelector(".content")

        if (title) title.classList.add("visible")
        if (content) content.classList.add("visible")
      }
    })
  },
  { threshold: 0.1 } // Trigger when 10% of the element is visible
)

// Observe each block
blocks.forEach((block) => observer.observe(block))
The CSS ensures that each block takes up the full viewport height and defines animations for smooth visibility transitions.
.container {
  display: flex;
  flex-direction: column;
}
.block {
  height: 100vh; /* Each block fills the viewport */
  display: flex;
  align-items: center;
  justify-content: center;
  gap: 20px;
}
.block .title,
.block .content {
  opacity: 0;
  transform: translateY(50px);
  transition:
    opacity 0.6s ease-out,
    transform 0.6s ease-out;
}
.block .title.visible {
  opacity: 1;
  transform: translateY(0);
}
.block .content.visible {
  opacity: 1;
  transform: translateY(0);
  transition-delay: 0.6s; /* Delay the content animation for a staggered effect */
}
This is what it looks like when opened in a browser.
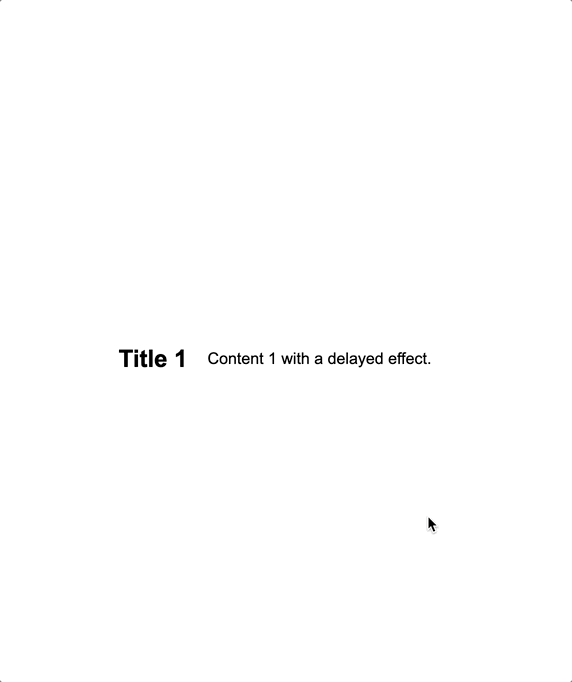
A basic implementation of the IntersectionObserver API
Adding a Custom Root
The Intersection Observer API allows specifying a custom root, such as a parent container, instead of the viewport. This can be useful for cases where elements scroll within a specific container.
Updated Javascript:
// Other code omitted

const observer = new IntersectionObserver(
  (entries, observer) => {
    entries.forEach((entry) => {
      if (entry.isIntersecting) {
        entry.target.scrollIntoView({ behavior: "smooth", block: "start" })
        entry.target.querySelector("h2").classList.add("visible")
        entry.target.querySelector("p").classList.add("visible")
      }
    })
  },
  { root: container, threshold: 0.1 } // Custom root specified
)

// Other code omitted
Updated CSS:
.container {
  width: 500px;
  height: 300px;
  border: 1px solid black;
  overflow-y: scroll; /* Enable scrolling within the container */
}
.block {
  display: flex;
  height: 100%; /* Blocks fill the container */
  background-color: lightpink;
  align-items: center;
  gap: 20px;
  padding: 0 20px;
}
Now the callback is triggered whenever a target element intersects with its parent.
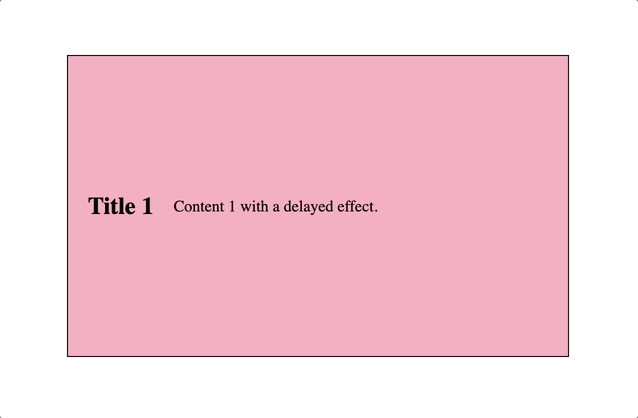
A basic implementation of the IntersectionObserver API
A React Example
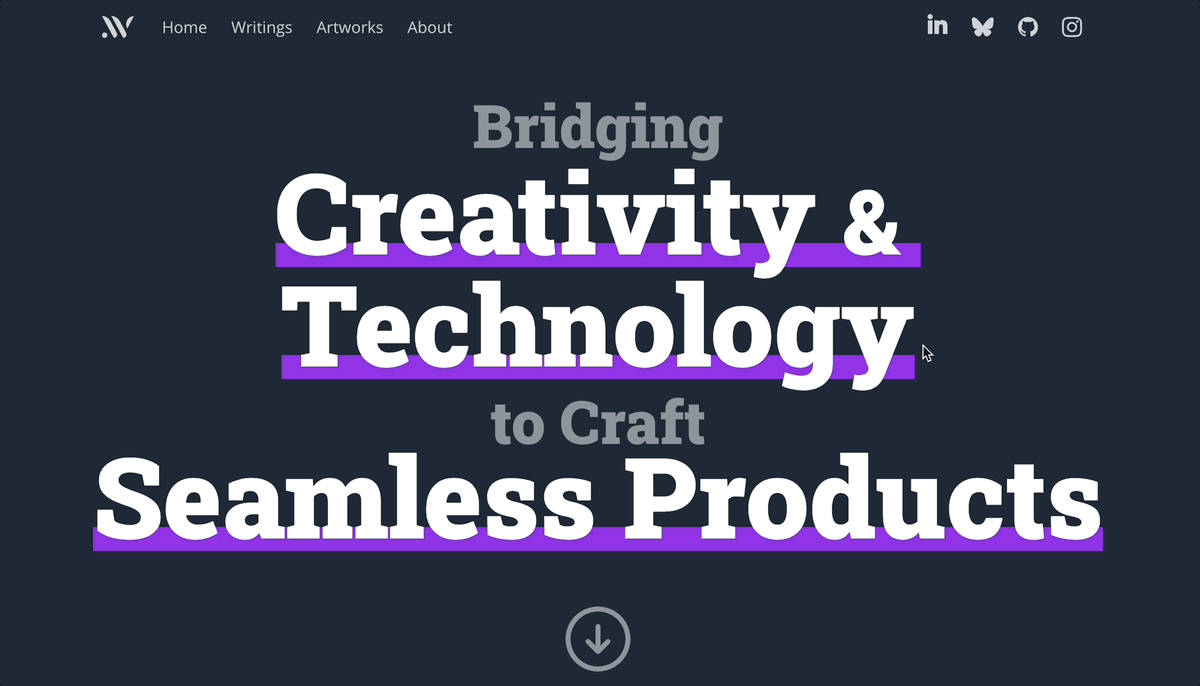
This is an example of implementing the scroll-and-snap effect on the top page of this site. The Intersection Observer API powers the animations, creating a seamless user experience.
export const ScrollAndSnap = ({ children }) => {
  React.useEffect(() => {
    const sections = document.querySelectorAll(".should-snap")
    const firstSection = sections[1]
    const scrollDownBtn = document.getElementById("scroll-down")

    // The behaviour of the scroll-button
    const handleClick = () => {
      firstSection.scrollIntoView({ behavior: "smooth", block: "start" })
      firstSection.querySelector(".heading")?.classList.add("visible")
      firstSection.querySelector(".content")?.classList.add("visible")
    }

    scrollDownBtn?.addEventListener("click", handleClick)

    const observer = new IntersectionObserver(
      (entries) => {
        entries.forEach((entry) => {
          if (entry.isIntersecting) {
            entry.target.scrollIntoView({ behavior: "smooth", block: "start" })
            entry.target.querySelector(".heading")?.classList.add("visible")
            entry.target.querySelector(".content")?.classList.add("visible")
          }
        })
      },
      { threshold: 0.1 }
    )
    sections.forEach((section) => observer.observe(section))

    // Do not forget to remove event listener and unobserve elements to prevent memory leak
    return () => {
      scrollDownBtn?.removeEventListener("click", handleClick)
      sections.forEach((section) => observer.unobserve(section))
    }
  }, [])
  return <>{children}</>
}
I used TailwindCSS for my site, but the idea applys to any other styling stragegies.
@keyframes popup {
  from {
    transform: translateY(100vh);
    opacity: 0;
  }
  to {
    transform: translateY(0);
    opacity: 1;
  }
}

.heading,
.content {
  @apply opacity-0;
}

.heading.visible {
  @apply animate-[popup_1.2s_ease-in-out_0.6s_forwards];
}

.content.visible {
  @apply animate-[popup_1.2s_ease-in-out_1s_forwards];
}
The Result
The resulting page features this cool scroll-and-snap effect that is actually quite common in modern websites and web applications.
Conclusion
In this tutorial, we explored the Intersection Observer API and demonstrated how to use it to implement a scroll-and-snap effect. This API simplifies detecting element visibility, enabling stunning animations and efficient user experiences. Whether you use vanilla JavaScript or frameworks like React, these principles are widely applicable.